Exporting or Printing Your LayOut Document
After you work hard to create and polish a LayOut document, you want your document to go out into the world and make its mark. You can present your work on-screen, but that isn’t always enough. Here are other ways you can share your document:
- Upload a document online or attach it to an email. You can export your document pages as JPEG or PNG image files that you can display on web pages. Or you can make a PDF that your audience can download from the web or as an email attachment.
- Open a document in a CAD program. You can also export your LayOut document to a DWG or DXF file, either of which is compatible with popular CAD programs.
- Print your document. Whether you need a high-quality print or just printouts of your pages for your audience to take notes, LayOut includes printing options to help you create just the printout you need.
Table of Contents
- Exporting a document as image files
- Creating a PDF of your document
- Exporting a document to DWG or DXF format
- Printing your document
Exporting a document as image files
When you export a document as a series of images, LayOut exports each document page as a separate image file, in either.jpg or .png format. The following steps, which reflect the selected operating system, walk you through the image-export process:
- From the menu bar, select File > Export > Images. The Export Images dialog box appears, as shown in the following figure.
- Navigate to the location where you want to save your images.
- In the File Name box, type a name that will begin each image file you export. If you export multiple images, LayOut exports a number to each image in the series, such as
Green Vale Homes_1.png,Green Vale Homes_2.png, and so on. - From the Save As Type drop-down list, select PNG or JPEG.
- Click the Save button. The Image Export Options dialog box appears.
- (Optional) In the Pages area, select whether you want to export all the document pages (the default) or just a page range. To print a page range, select the From/To radio button and enter the page range that you want to export.
- (Optional) To change the size and resolution of your exported images, enter a new width or height value or type your desired resolution. These three settings are constrained so, for example, changing the width automatically adjusts the height to maintain the image’s aspect ratio.
- (Optional) By default, your exported images open in your default image viewer. Deselect the Show Export in Image Viewer checkbox if you don’t want to open the images in this program.
- Click the Export button. The images are exported to the location you selected in Step 2.
Creating a PDF of your document
When you export a PDF of a document, LayOut creates a single PDF file that contains your document pages. To export your document as a PDF, follow these steps, which reflect the selected operating system:- From the menu bar, select File > Export > PDF. The Export PDF dialog box appears, and the PDF format is already selected in the Save As Type drop-down list.
- Navigate to the location where you want to save the PDF.
- In the File Name box, type a name for the file.
- Click the Save button. The PDF Export Options dialog box appears, as shown in the following figure.
- (Optional) The location and filename in the Export File field reflect the location you chose in Step 2. If you change your mind, click the Choose button and select a new location.
- (Optional) By default, LayOut includes all the pages in your document in the PDF. To specify a page range instead, select the From/To radio button and type the page numbers for your desired page range.
- (Optional) To change the quality for rendering models and images in your exported PDF, select an option from theOutput Resolutiondrop-down list.
- (Optional) A great way to reduce the file size of the resulting PDF is to compress images in your LayOut document. Select the Use JPEG Compression for Images option and move the slider to Smaller File to reduce the quality of the images and reduce the file size as well. For a higher quality image, however, move the quality slider to Better Quality.
- (Optional) By default, LayOut creates a PDF layer that corresponds to each layer in your document. If you don’t want LayOut to create these layers, deselect the Create PDF Layers from LayOut Layers checkbox.
- (Optional) By default, LayOut displays the exported PDF file in your system’s PDF viewer, such as Adobe Reader. If you don’t want LayOut to open the file for you, deselect the Show Export in PDF Viewer checkbox.
- Click Export, and LayOut creates the PDF in the location you specified in Step 2.
Exporting a document to DWG or DXF format
DWG and DXF are file formats that open in popular CAD programs. To export a document to one of these formats, follow these steps, which reflect your selected operating system:- From the menu bar, select File > Export > DWG/DXF. The Export DWG/DXF dialog box appears.
- Navigate to the location where you want to save the file.
- In the File Name box, type a name for the file.
- In the Save As Type drop-down list, select DWG or DXF.
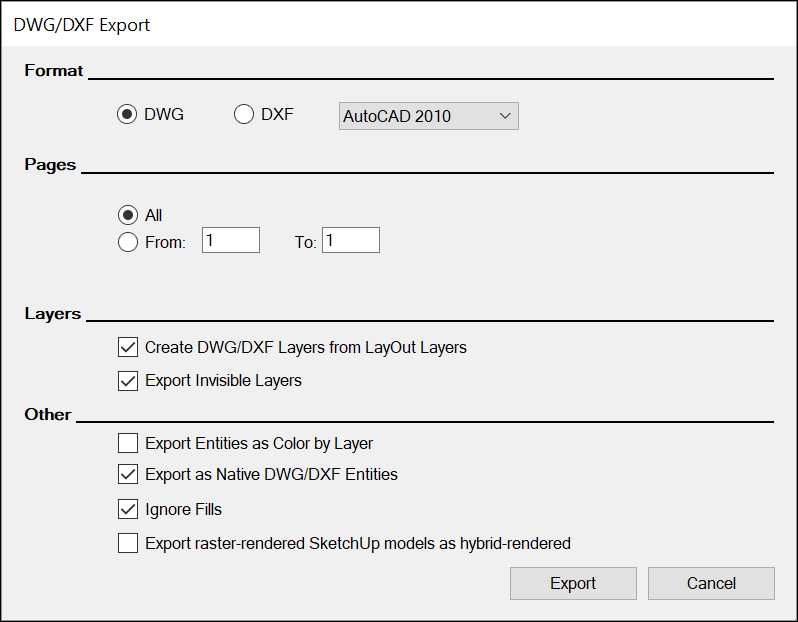
- Click the Save button. The DWG/DXF Export dialog box appears, as shown in the following figure.
- (Optional) In the Format area, from the drop-down list, select the version of AutoCAD in which the file will be opened. The file format (DWG or DXF) reflects the option you selected in Step 4, and you can change that here if you like.
- (Optional) By default, LayOut includes all the pages in your document in the exported file. To specify a page range instead, select the From/To radio button and type the page numbers for your desired page range.
- (Optional) By default, LayOut creates a DWG/DXF layer that corresponds to each layer in your document. If you don’t want LayOut to create these layers, clear the Create DWG/DXF Layers from LayOut Layers checkbox.
- (Optional) By default, LayOut exports hidden layers (also known as invisible layers) to your DWG or DXF file. If you don’t want LayOut to export these layers, clear the Export Invisible Layers checkbox.
Tip: If a layer is hidden on all pages, the layer is exported as hidden. If the layer is hidden on some but not all pages, only the visible entities are exported.
- (Optional) Instead of exporting colors you specified in LayOut, you can export each layer's entities as a different color based on its layer. To do so, select the Export Entities as Color by Layer check box.
- (Optional) By default, LayOut exports its entities as native DWG/DXF entities. If you clear the Export as Native DWG/DXF Entities check box, LayOut entities are exploded into raw geometry in the exported file. For example, in the DWG/DXF file, a LayOut dimension is exploded into lines and text and has none of the usual dimension behaviors.
Tip: LayOut exports dimensions, labels, circles, arcs, ellipses, and tables as native DWG/DXF entities.
- (Optional) LayOut does not include any fills that your document contains in the exported file. Clear the Ignore Fillscheckbox if you want those fills in your exported file.
- Click Export, and LayOut creates the DWG or DXF file in the location you specified in Step 2.
Note: LayOut entities are exported into paper space. SketchUp model entities (except models in Perspective view) are exported into model space.
Printing your document
The great German philosopher, Friedrich Nietzsche, once said, “Print is dead.” Or something like that. (Beware the accuracy of quotes you find on the Internet.) Regardless, people stopped heralding the advent of the paperless office years ago. Printouts still have a place and a purpose in this world. If you have such a purpose for your LayOut document, this section guides you through the printing process. Whether you use LayOut for Microsoft Windows or Mac OS X, the basic printing process is the same:- Select File > Page Setup to check your page setup options.
- Preview your printout.
- Select File > Print to select your final print options and send your presentation to the printer.
- From the menu bar, select File > Page Setup. The Page Setup dialog box appears.
- From the Size drop-down menu, select a paper size.
- From the Source drop-down menu, select the printer tray that contains the paper you want to use.
- Click OK in the Page Setup dialog box.
- Select File > Print Preview to open the Print Preview dialog box, shown in the following figure.
- Preview each page of your document to make sure it will print as you like. Use the Zoom menu in the upper left to zoom in or out of the preview area. Next to the Zoom menu, you can click an icon to select how many pages you see in the preview area. In the upper right, type a page number in the Page box to navigate to a specific page in your document.
- Click the Close button and select File > Print, or click the Print icon in the upper left of the Print Preview dialog box. Either way, the Print dialog box appears, as shown in the following figure.
- In the Select Printer list box, select a printer. (If you don’t see your desired printer, click the Find Printer button and try to navigate to it in the dialog box that appears.)
- (Optional) Select the Print to File checkbox to create a
.prnfile with formatting and layout data that enables a printer to print the document outside of LayOut. However, note that this file was designed to work with parallel printers and often doesn’t work with modern USB or wireless printers. - Click the Preferences button to open the Printing Preferences dialog box. The following figure shows the printing options for the selected EPSON printer, but the options you see vary, depending on the printer you selected in Step 8. Check the documentation for your printer for details about your options. When you’re done setting your printer-specific printing preferences, click OK.
- (Optional) Back in the Print dialog box, the default page range is All. To print a specific page range, select the Pagesradio button and enter a page range in the text box.
- (Optional) To print more than one copy of your document, type how many copies you want in the Number of Copiesbox. Or use the arrows to specify a number. If you print more than one copy, you can choose how your printer collates the copies.
- Click the Print button and (at last!) your document is sent to the printer.
Related Articles
LayOut
LayOut and SketchUp Pro are designed to work together. After you insert a SketchUp models into a LayOut document, you can design the document to highlight your 3D model's best features. If you ever need to change or update your original SketchUp ...Presenting Your LayOut Document
If, like most people, you feel jittery about giving a presentation and public speaking in general, hopefully, LayOut’s simple-to-use, interactive presentation features can help to put you at ease. To access LayOut’s presentation features, select View ...Creating Documents in LayOut
LayOut is packed with tools and features to help you create high-quality documents and presentations of your SketchUp models. Tip: If you’re new to LayOut, check out the introduction to the LayOut interface , the basics of creating and saving a ...Extracting Source Content from a LayOut File
Creating a LayOut document is mostly about bringing content into your document. But if you ever want to reuse or update a document’s referenced content in another format or program (and you don’t have the original file or updated the content after ...Fixing an Issue in LayOut
When an error occurs as you create documents in LayOut, the error reporting system, BugSplat, may ask you to send information. Also, LayOut occasionally has trouble rending hardware-accelerated vector graphics. The subarticles in this section ...